Friday, May 28, 2010

Upper Bunk Cleanup

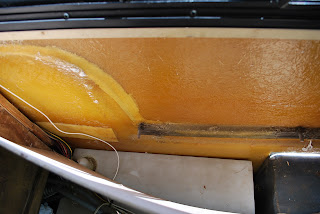
Before
Moving on to the Upper Bunk I had come to the decision of painting the fiberglass since it would give it more of a fresh, clean line look.  I began by sanding & scraping all the old fiberglass and was very careful not to get too out of hand in the sanding process.  This took no time in doing but left quite a mess of fiberglass dust behind.  I then removed all the old caulking and replaced with new.  I originally had the carpet butt right up under the windows.  But my common sense told me to remove it and paint it instead in preparation for the potential leaks that may occur in the not to distant future.


With the three coats of paint it sure had brightened the bunk considerably.  With some finishing touches that need to be done on the paint, I now need to custom make and install the curtain rod tracks and this project should be a done deal.  Moving on to the next project.....

Tuesday, May 25, 2010

LED Tail Light Installation


So, my new LED Tail lights arrive and now I swallow hard because I have to do some fiberglass cutting to make them fit. This will be one of many first's for me.  I start by taking measurements.  Then I take more measurements.  Then I re-take the measurements I have already taken.  Whew, okay, I think I'm ready.  I tape off the desired area and I make the first cut with my dremel tool.  It actually cuts like butter and it turned out to be a lot easier than expected.  


The new LED's fit in perfectly and I couldn't be happier. Now, here comes the bad news.  The tail light wiring has a ground problem.  After several days of checking and chasing wires, I have but no choice to turn this job over to someone with more knowledge of automotive wiring other than myself.
On to the next project.....

Wednesday, May 19, 2010

Caulking & Sealing


So, with the upper bunks windows on hold and the LED's on order, I decided to go around the exterior of my little rig to see what else needs to be sealed.  It turns out there was quite a bit to do.  I painstakingly removed all of the old caulk from every window, door, awning, baggage doors, etc.  You name it, I re-caulked it.  I went as far as removing a wall to get behind it, in order to not only caulk the outside of the water heater compartment but the inside as well.  Okay,  onto the next project......


Wednesday, May 12, 2010

More Leaks?

Below the Tail Light


Okay, here we go!  Guess what?  I have another leak!  Not just any leak. This leak was very sneaky and it only happened when I was not looking.  It had taken me days to find, and I finally found it......it's the tail lights!  Those tail lights that I had previously caulked. How in the world are they leaking?  I butyl taped and caulked the snot out of them!  Ugh!  Alright, enough of this, I'm getting myself some LED's. It's the rave right now and I'm ready to join in on the fun.
Removed all Dinette Cushions

Wednesday, May 5, 2010

Upper Bunk Windows

Leaky upper bunk windows....Hmmm, who came up with that idea of putting wrap around windows on a Toyota's upper bunk?  Whoever did, evidentially does not own one.


With months of leak testing, removing old sealant and re-sealing the windows, I have come to the conclusion that all the work I do to make them stop leaking, is only temporary.  I do not want to remove those precious, costly to replace windows if my life had depended on it, but I have no choice in the matter to do just that.   This project will have to wait until the fall or next spring, since I am not going to waste another summer of not camping.  My son said it best:  Hey, Mom....we'll just go camping when it's not raining!  Okeedokee then, problem solved for this summer.  Onto the next project.......